This DIY Tray Upcycling Project is the perfect way to take something as simple as a cardboard box and transform it into a beautiful decorative tray. If you love upcycling, repurposing, and DIY crafting, this tutorial will inspire you to turn trash into treasure with just a few supplies!

Why Upcycling is the Best DIY Trend
Upcycling is a fantastic way to reduce waste, save money, and create custom home decor that fits your style. Whether you follow Feng Shui, minimalism, or rustic home decor guidelines, upcycling projects like this DIY Tray add a personal touch while keeping sustainability in mind.
Plus, creating home decor from repurposed materials is an excellent way to challenge your creativity and showcase your crafting skills.

DIY Tray Using Upcycled Materials
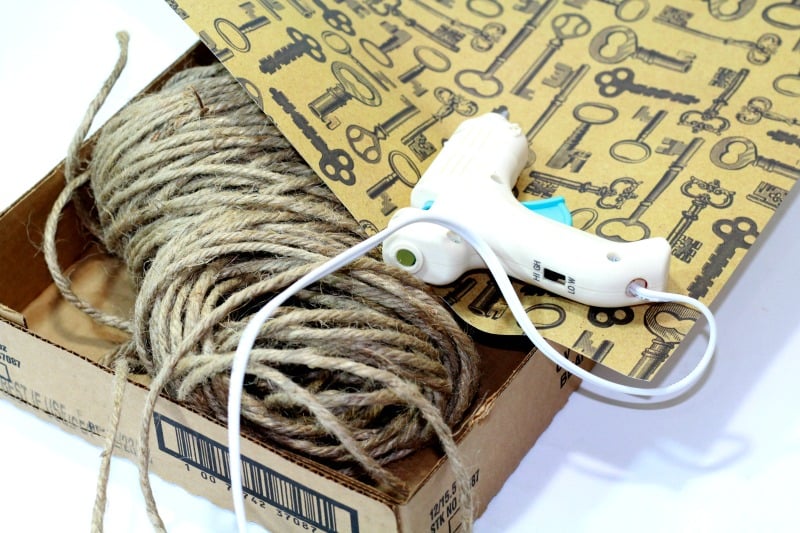
Supplies You’ll Need:
- A sturdy cardboard box (like the ones used for canned goods)
- Hot glue gun and glue sticks
- Jute rope or thick twine
- Decorative scrapbook paper or fabric
- Scissors
- Optional: Decorative handles for extra charm
Step-by-Step Instructions:
1. Prepare Your Base
Start by choosing a cardboard box that will serve as the base of your tray. If needed, trim the edges to create a more uniform shape.
2. Add the Decorative Bottom
Measure the inside of the box and cut a piece of scrapbook paper or fabric to fit. This will serve as the decorative base of your tray. Secure it in place with hot glue, smoothing it out to avoid wrinkles.
3. Wrap with Jute Rope for a Rustic Look
Using a hot glue gun, start wrapping the jute rope around the outside of the box. Begin at the bottom and work your way up, ensuring each row is tightly secured. This not only strengthens the tray but also enhances its aesthetic appeal.
4. Create Handles for a Functional Design
For a stylish and functional touch, create handles by forming loops with the jute rope and gluing them to the inside edges of the tray. This step adds a practical yet decorative element, making it easier to carry your tray.
5. DIY Tray Final Touches
Ensure that all edges are neatly covered and that the rope is firmly in place. Once everything is set, your DIY tray is ready for styling!
Styling Your DIY Tray for Home Decor
Trays are versatile decor pieces that can be styled in various ways. Whether you prefer a minimalist look or an eclectic display, here are some ideas:
- Coffee Table Centerpiece: Place candles, books, and a small vase for an elegant touch.
- Bathroom Organizer: Use the tray to hold rolled towels, soap dispensers, and decorative accents.
- Kitchen Display: Arrange spices, napkins, or a small potted plant to enhance your kitchen counter.
- Entryway Catch-All: Keep keys, sunglasses, and other essentials in one place.
For more inspiration, browse Pinterest and discover creative ways to decorate your upcycled tray!

Why This DIY Tray Project is a Must-Try
- Eco-Friendly: Reduces waste by repurposing old materials.
- Budget-Friendly: No need to buy expensive decor when you can make your own.
- Beginner-Friendly: Simple steps that anyone can follow.
- Fully Customizable: Choose colors, patterns, and textures that match your home decor.
Join the Upcycling Movement!
Upcycling is not just a trend—it’s a lifestyle. If you love transforming everyday items into stylish home decor, this DIY tray project is a great start. Try it out and share your results with us!
While you’re here, don’t forget to pin this post for later and share it with fellow DIY enthusiasts. Have you tried upcycling before? Let me know in the comments!
- DIY Nightstand Makeover: Before and After Furniture Makeover
- DIY Canvas Frame – Easy & Budget Friendly
- 1 Hour DIY Wood Accent Wall Idea for Less than $75
- DIY Upcycle Kids Clothes
About Thirty Something Super Mom

My journey started after a Crohn's disease diagnosis, inspiring a commitment to well-being. This site shares my distinctive approach to healthy living with my collection of nutritious recipes that boast authentic flavors, mimicking the indulgence of traditional dishes. I love sharing guilt free recipes for low carb, keto, gluten-free, paleo, and the specific carbohydrate diet. I also share tips on natural living, including homemade cleaners and cleaning hacks. I also share my experience as a veterinary technician and pet groomer, to integrate pet health tips, homemade dog food recipes, and grooming insights to ensure your pets thrive.
Brilliant! Your upcycle looks great. I’ve never used the cardboard carrier for a permanent project, but I use them often to carry casserole dishes to pot luck. Maybe I can make one a tray like you did and use it for transporting. Just like you, I feel like I can’t style a tray. All of theo ones I see on Pinterest look great, but I can never seem to replicate them. Thankfully, my adult daughter has that creative eye and I can put her to work.
WOW! You did this with a canned good cardboard box and some twine. This is really neat and turned out great. I would love to do this as a craft in one of our Summer Camp craft make ‘n take sessions. Thanks for sharing.
That sounds like fun, and thanks for stopping by!
Oh yes! I do love that saying “one man’s trash”… It couldn’t be more true for just about EVERYTHING in this world! My husband found a dresser on the side of the street and grabbed it for me, LOL! It was a POS but hey, it gets the job done for now – until we move into our forever home!
I am admittedly not great at crafting or DIY, but I think even I could do this! I love that it’s both easy and inexpensive to make. And I don’t think your tray is overstyled at all 🙂
Thank you!
I love everything about this project. I love crafts that are simple. You can’t get easier than twine, a glue gun and a cardboard box!
Now this is a great idea! I love finding ways to do DIY projects with my kids that use items that we already have around the house. Makes the project even more fun in my opinion! Love this!
I love to watch others DIY projects. I admire them but never tried to do by myself. I think I don’t the patience! Yoyr tray seems so easy to make and looks fantastic!
This turned out lovely. I love the fact that you literally turned trash into treasure. A cardboard box never looked so pretty! Great job! Can’t wait to see what you will come up with next!
I like the finished tray. Thank you for sharing this DIY project!
I would’ve never thought of that! That’s so cool. I love it. Thank you
This is a great project. Beautiful!
This is a great idea! Love it.
This is so cool! I would have never thought of this!