I am so excited to share this Makeup Vanity Makeover, not only because it turned out so great but because this piece of furniture means a lot to me and I love the backstory.
It reminds me of the good old days, don’t get me wrong, these days are great but it is nice to remember where you came from.
It gives you a starting place to measure your growth against and to see how far you have come.
Yes, that goes for furniture makeovers, too!
I love that accomplished feeling that rushes over me when I have completed a DIY furniture makeover.
So I want to share some tips I learned on how to repurpose furniture with paint.
This Makeup Vanity Makeover is brought to you through a partnership with Country Chic Paint. All opinions are my own, as usual.

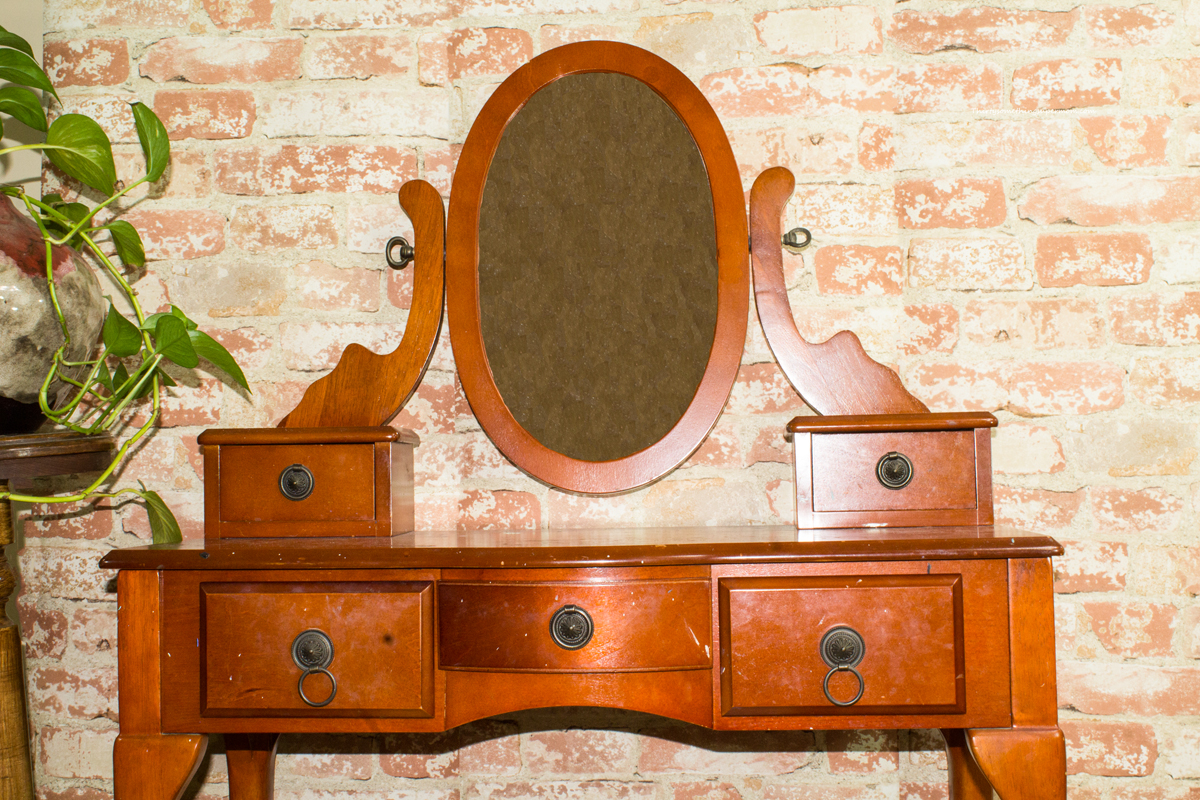
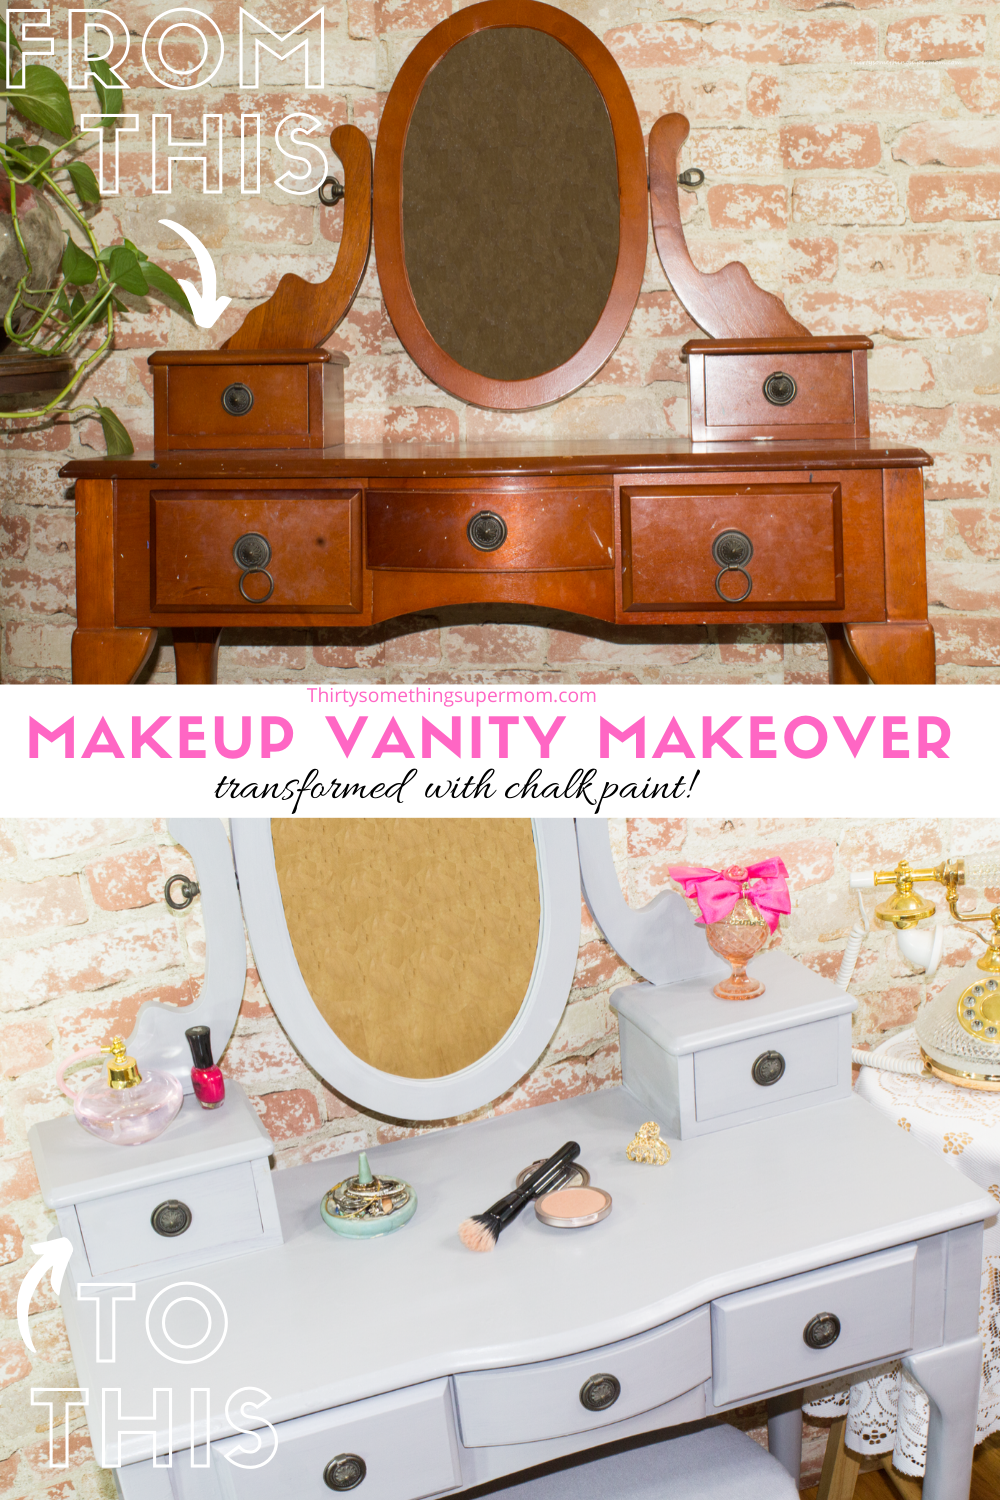
This makeup vanity started in pretty rough shape and since I took pictures to share this DIY project, you can see how far it has come too, but first let’s talk about where it came from.
Makeup Vanity Makeover Inspiration
On one of the first Christmases my husband and I spent together as a married couple, I received a box full of cinderblocks.
He seriously wrapped up a bunch of cinderblocks in Santa Claus paper and placed it under my tree, just waiting for Christmas morning.
He knew for weeks what sat in that shiny box, waiting for me to open and when I was finally let in on the secret, it was pretty funny.
He wanted to surprise me but this kind of gift was not easy to disguise when assembled.
He decided to store it in the basement, and then he wrapped up some cinderblock with a note taped to the side.
Once I opened the notebook paper, I read the words scribbled inside that sent me on a journey to the basement.
When I finally got to see my actual present that could not be wrapped, without giving away its contents, I saw this vanity for the first time.
Even as a kid I asked for one of those plastic knock-off Fisher-Price ones with the big gaudy light bulbs surrounding the mirror but this was a real, grown-up, classy-looking vanity.
I loved it more than any other piece of furniture I had ever owned. He nailed it.
Unfortunately, since I had very little experience owning the furniture, I didn’t know how to take care of it properly.
So over the next sixteen years of owning this beautiful vanity, I beat it up pretty well.
Now that I know a little bit more about how to properly take care of things, I am repurposing and making over all of my favorite pieces.
I have even started painting the walls, not with chalk paint but you get the idea.
I am not only doing furniture makeovers but giving my entire house a makeover.
I am using lots of new colors that I shied away from in the past for some reason and am enjoying the ability to be as creative as I want.
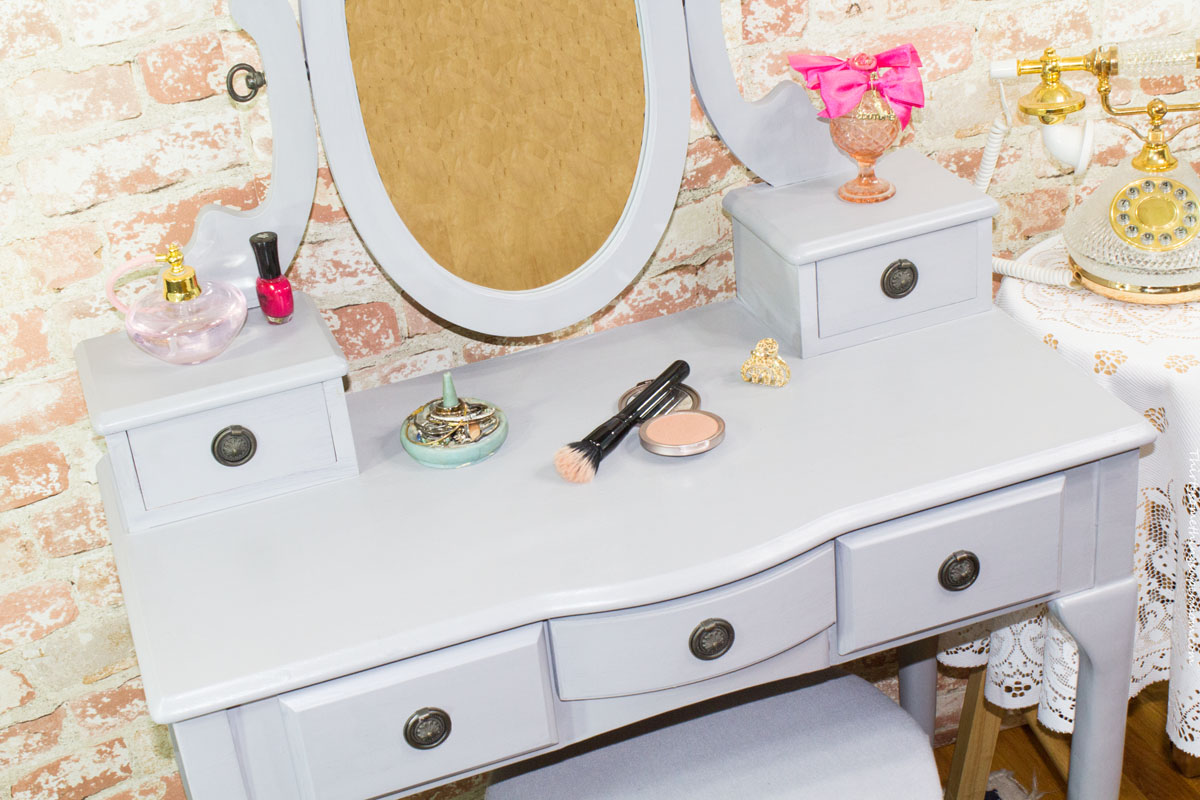
Chalk Paint Makeup Vanity Makeover
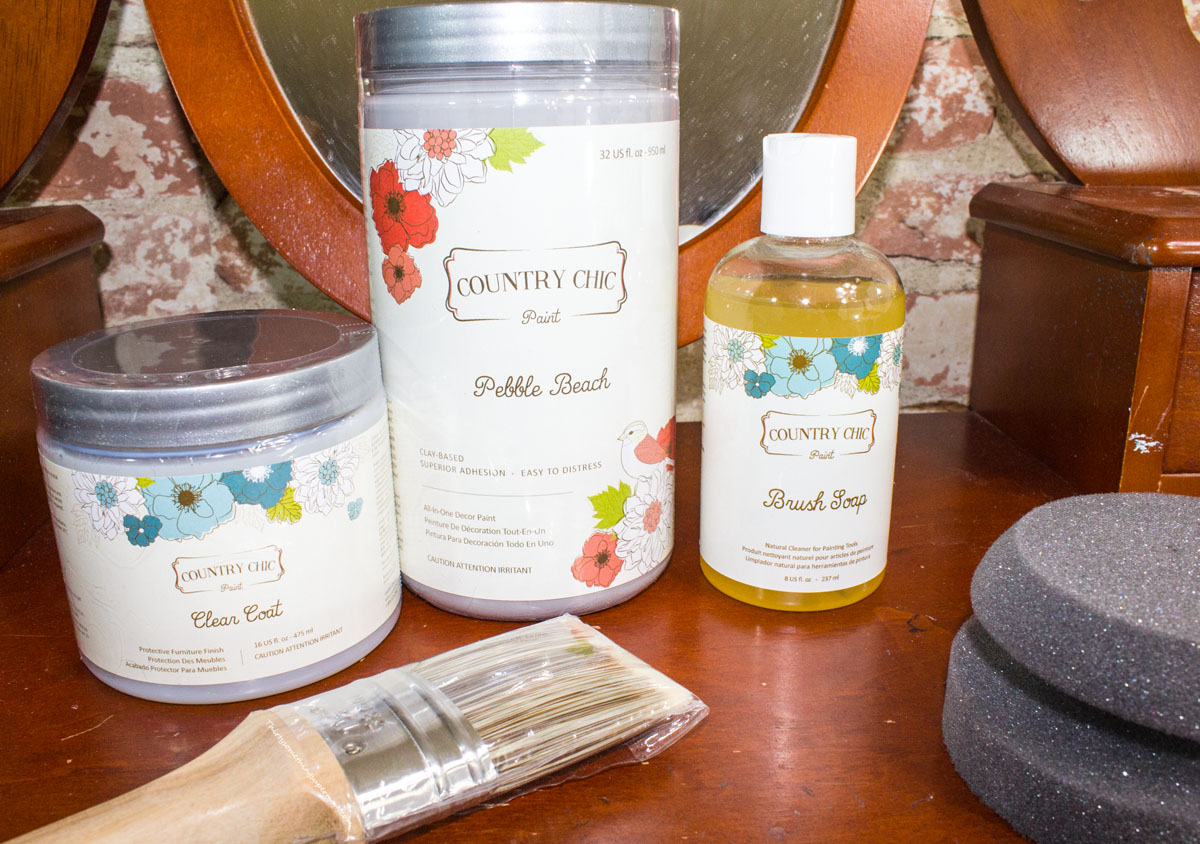
Thankfully, Country Chic Paint has so many beautiful color options to let you be creative, no matter what color your creativity calls for!
Not only is it easy to use, but in my experience, it provides the best coverage which is amazing when you keep in mind that these paints are safe as well as environmentally friendly.
The damage to my vanity seemed like it would be there forever, I didn’t know that there was a paint that would allow me to make this piece look brand new again until I found Country Chic Paint.
Now, I am going to share two very important things today, one of them is a makeup vanity makeover and the other is a warning, something I learned the hard way.
If you wear perfume and keep the bottles on your makeup vanity, make sure they aren’t leaking.
That is where most of the damage to my makeup vanity’s surface came from, so don’t let the original look die in vain, heed this information.
I am going to remember what those perfume bottles did to my vanity and am going to do everything I can to protect it this time.
I will keep leaky bottles far away from it.
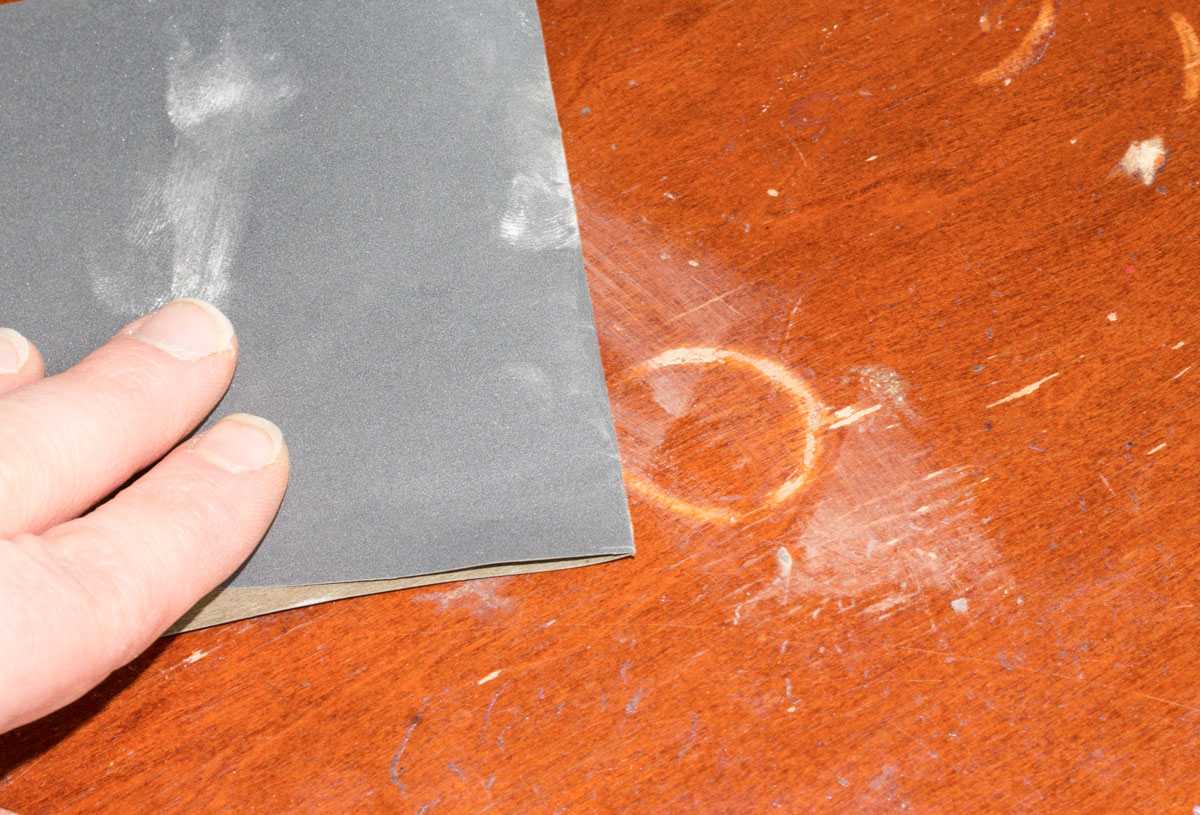
Once I was done sanding, and painting the makeup vanity, I added a layer of clear coat, to give it an extra shine.
That is something else I love about Country Chic Paints, the clear coat allows you to put multiple coats on, to give your piece as much, or as little shine as you would like.
Although I loved this makeup vanity when I looked at it for the first time, everything happens for a reason.
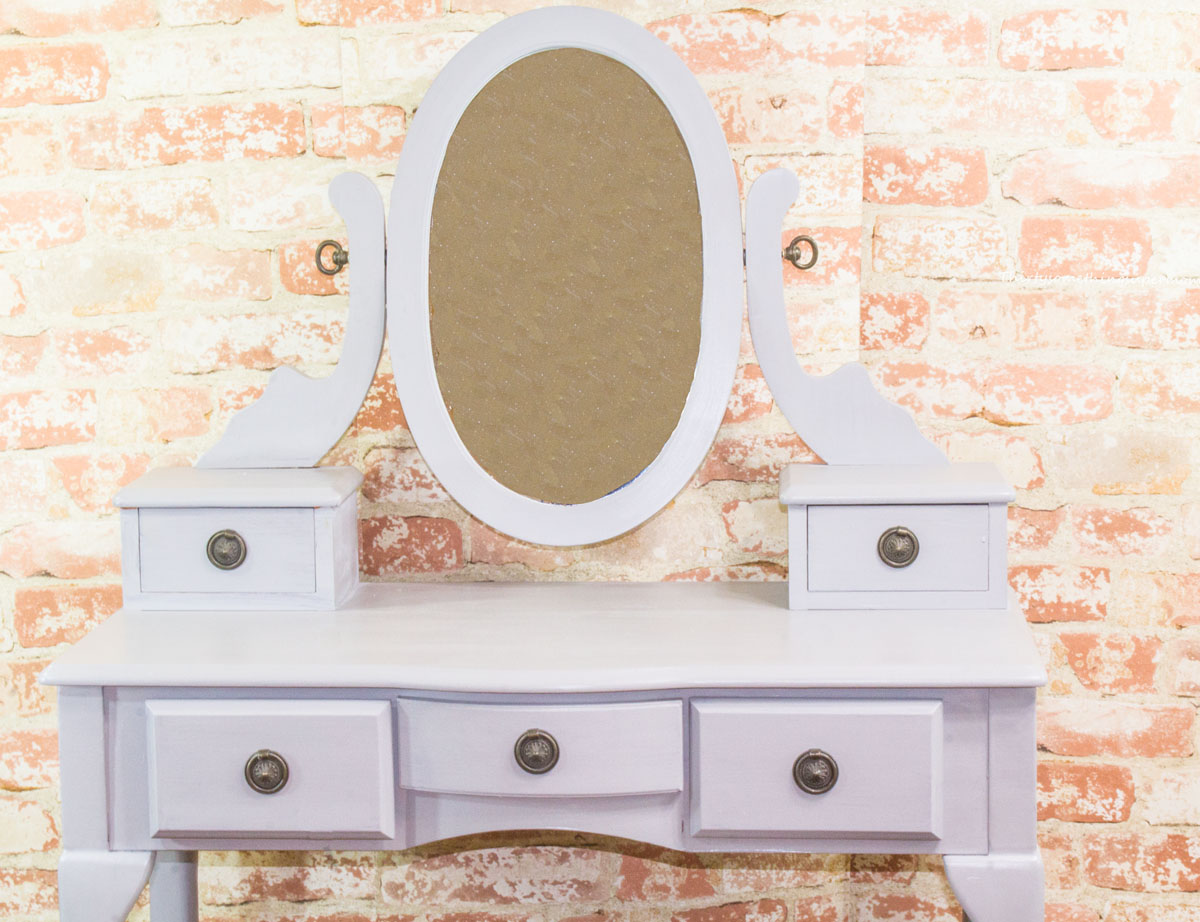
In the end, this worked out great because I loved the way that the vanity came out.
Plus, with all of the DIY projects and furniture makeovers going on around here, this fits in better with my decor.
Makeup Vanity Transformation
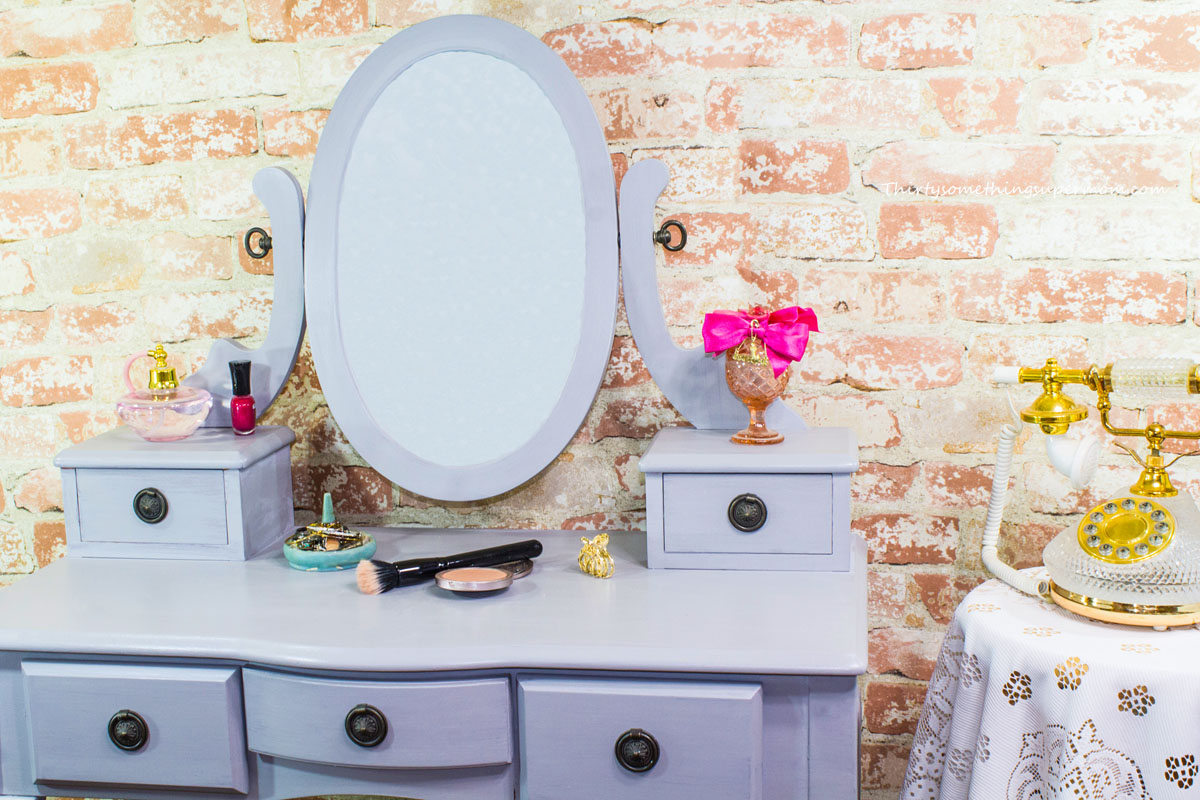
In case you want to replicate what I did here, the chalk paint color used to paint this vanity is Pebble Beach.
It started as a cherry wood that kind of had a left out in the sun look to it.
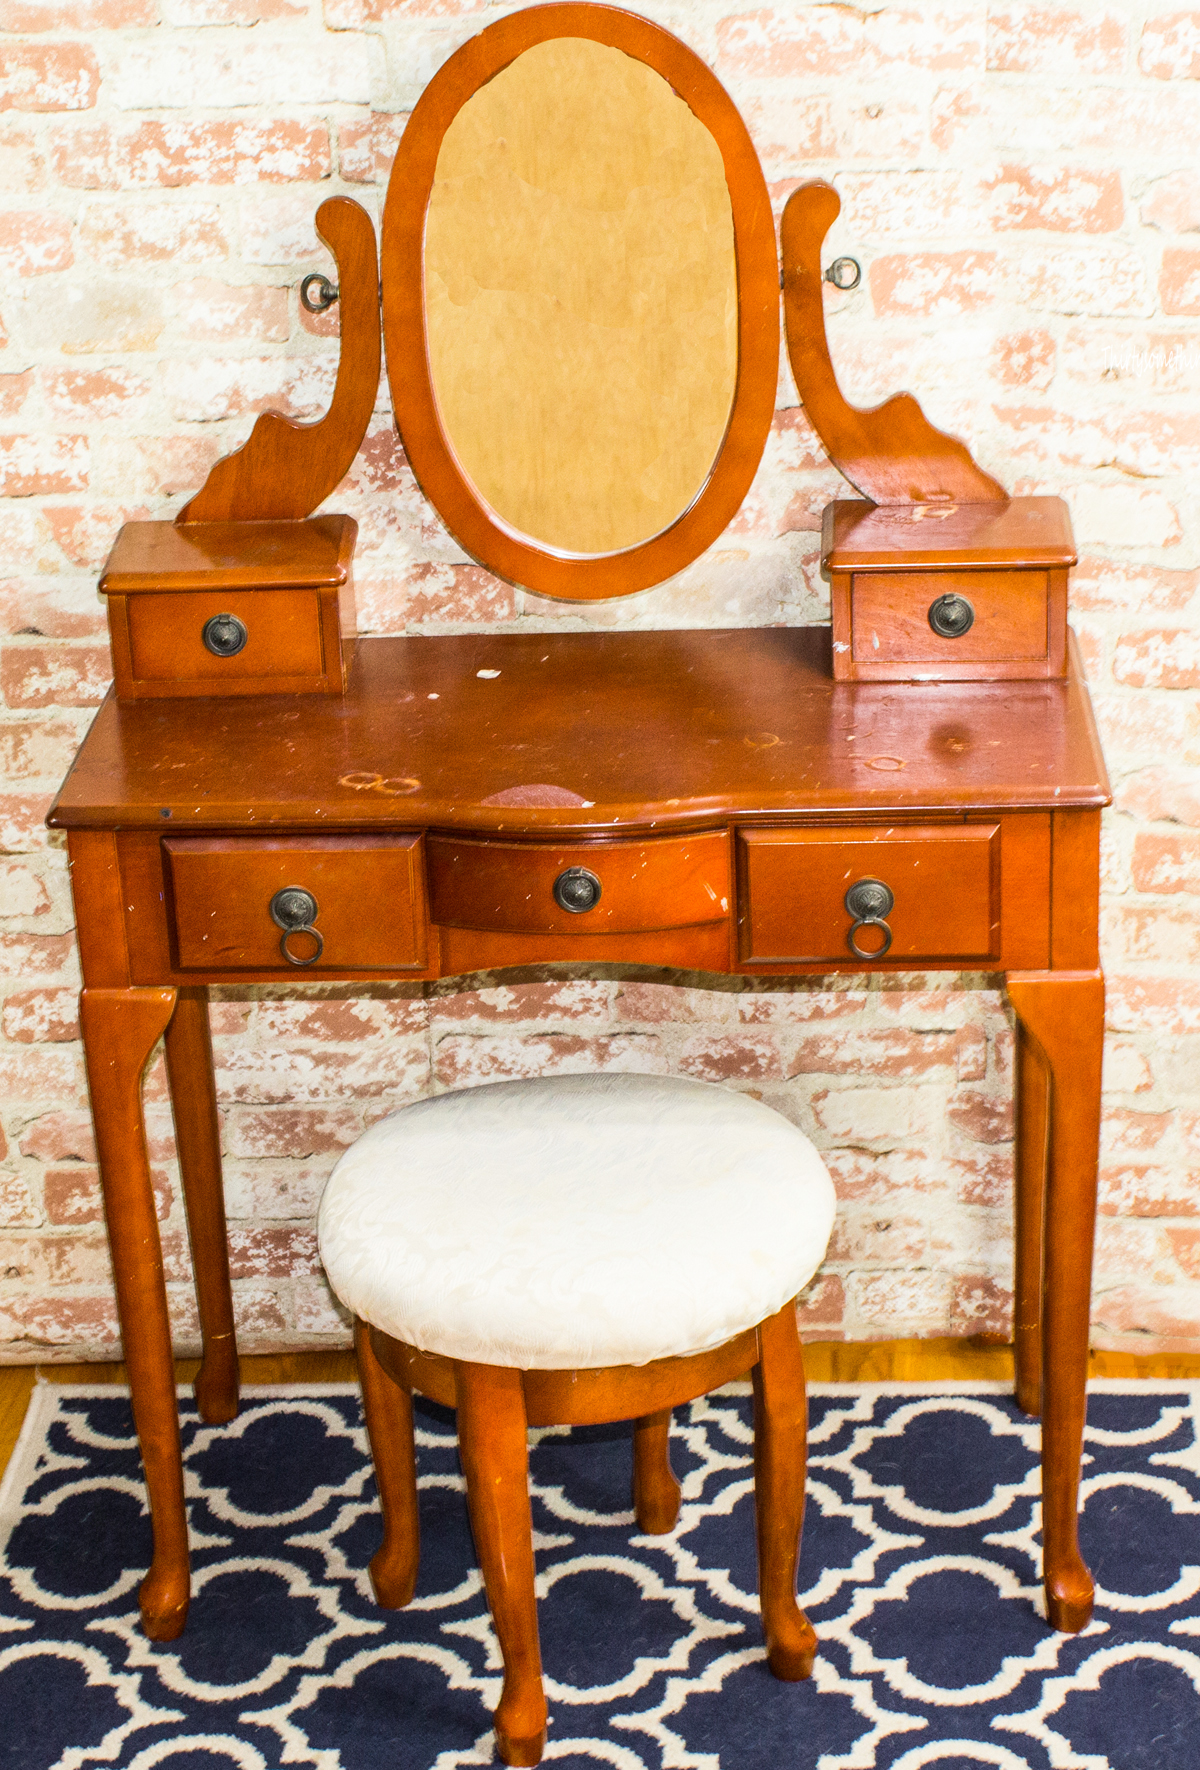
The stool was covered in white that began to show its age as well, so I used a piece of gray fabric to reupholster it and painted the legs with the Pebble Beach as well.
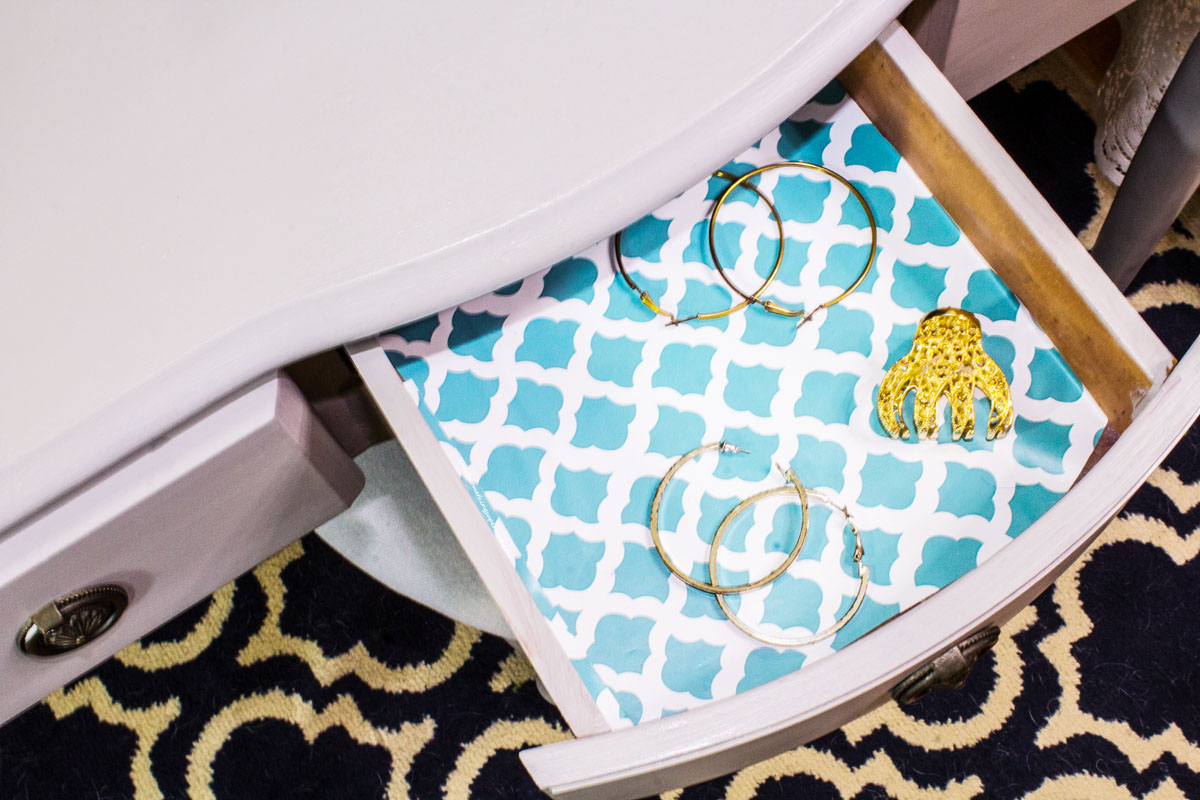
I also added contact paper in a pretty shade that matched both my walls and the vanity paint color.
I think I picked it up at the dollar store, it will serve the purpose of protecting the inside.
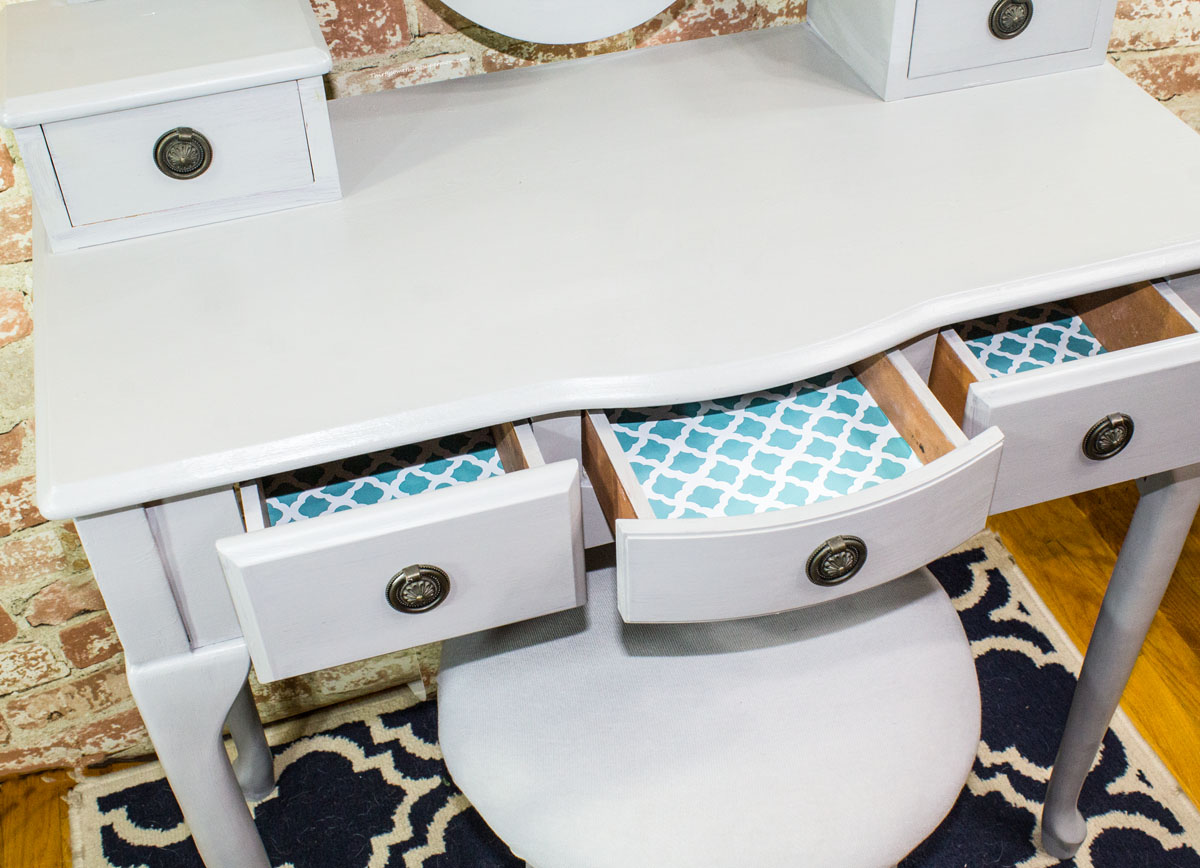
Plus I like the color combination of blue and gray, that is the pairing I have come up with for my bedroom.
I am trying to add more gray shades because it is easy for me to get out of hand with blue.
I don’t know why, but every time I get a project in mind, blue is my first choice of color.
My couch is blue, and my bedroom is blue, but I decided to paint this makeup vanity gray to change things up a bit.
I am glad to have decided to stay away from blue for this project because Pebble Beach is the perfect color to paint a vanity, using chalk paint.
I don’t think I could have picked out a better color or a better paint to use for this Makeup Vanity Makeover, I love the way it turned out.
If you want more furniture transformation ideas, you will love this DIY Furniture Makeover that turns a TV stand into a Buffet.
Frequently Asked Questions
Can You Paint a Makeup Vanity?
Yes, using chalk paint to paint a vanity is a great way to cover up blemishes and topping it with a clear coat allows you to continue to use the surface for storing makeup and applying it without ruining the new finish.
Can I Paint a Finished Vanity?
Yes! Follow the steps for painting a bathroom vanity or any cabinet with existing paint. Begin by taking off the hardware, doors drawers, and hinges. Address any hardware holes or imperfections with wood filler. Use sandpaper to smooth away the top layer of paint and then begin painting with chalk paint and finish the top off with a clear coat to protect the new finish.
Do I Need to Sand Vanity Before Painting?
Sanding the surface of your vanity is a crucial step in achieving a smooth finish. This process not only eliminates any imperfections but also prepares the surface to better absorb and adhere to the chalk paint. It sets the foundation for a flawless application and ensures a professional-looking result.
Want More DIY Inspiration?
You’ll love these easy DIY projects for the home.
How to Make an Easy Upholstered Ottoman DIY- No Sew
DIY Countertop Makeover from Laminate to Butcher Block for Less
Vintage Storage Chest to-Table DIY
DIY Farmhouse Curtains (No Sew)
1 Hour DIY Wood Accent Wall Ideas for Less than $75
Easy DIY to Transform the Look Of Your Kitchen
Don’t forget to sign up for the free newsletter and follow along on Pinterest so you never miss another post again.
About Thirty Something Super Mom

My journey started after a Crohn's disease diagnosis, inspiring a commitment to well-being. This site shares my distinctive approach to healthy living with my collection of nutritious recipes that boast authentic flavors, mimicking the indulgence of traditional dishes. I love sharing guilt free recipes for low carb, keto, gluten-free, paleo, and the specific carbohydrate diet. I also share tips on natural living, including homemade cleaners and cleaning hacks. I also share my experience as a veterinary technician and pet groomer, to integrate pet health tips, homemade dog food recipes, and grooming insights to ensure your pets thrive.
Hey this turned out super well! I like the way the way the new color looks on the corners of the drawers. It has a nice effect!
Oh wow what a difference some paint makes! That has turned out absolutely beautifully. I love the clean look of it.
Oh wow, how pretty! I love how this came out. I might have to try this out if I come across some old furniture.
wow this is truly stunning- we have a few of these id love to try and create myself to make it look more modern and with your help i just might do it.
WOW! This is such an amazing transformation. I love the colors you used, and your attention to detail.
Wow! I am so loving this makeover! My wife will love this when she sees it, too! She might think of turning her own like this.
OMG! How awesome this makeover is! And it seems so easy with your tips!
Well done!! Love what you did in the drawers. Adore the color.
You made such a beautiful DIY here… I would have never thought to use chalk paint! I love how bright you made it.
I love how beautiful it turned out! The color is cool. I would want something like this.
Thanks!
I love it. I’m got a few pieces that I would love to paint in the next year. Not sure what color to paint them yet. White would probably look the best.
I have been known to paint some pieces white, I just love the bright clean look, but I also love color. Maybe a white piece with some pops of color?
I love refinishing furniture. You did a great job with this, it looks great!
Thanks, it is so much fun to do, isn’t it?
I love how it turned out beaufitul leaving the vintage touch. The gray color works and looks good too.
Thanks!
It turned out so cute! I love your choice of color… a great addition to any space!
Thank you!
Hello! I was hoping you could help me. I happen to have the exact same vanity except mine was missing the mirror when I bought it. Interesting to see yours because I never knew what the mirror looked like. I bought it with intentions of using it as a desk, which I have been. I love it but mine also needs a rehab. I want to sand and stain it a lighter color but I fear it may not be the right wood. Is it real wood?
Hello Laurie. Thanks for stopping by and commenting. That’s so cool that you were able to recognize your vanity through this post and see the mirror for the first time. While it is real wood it isn’t of the highest quality. I would suggest starting this project by sanding down an inconspicuous spot and testing a small area. This way you can get a better idea of what you are working with or use chalk paint. They have lots of light colors available, some that are designed to look like stain and this wouldn’t require any sanding.Good luck on your project and I hope this helps at least a little bit.